
Get insights like this delivered to your inbox
Join 2,500+ GTM professionals. No spam, unsubscribe anytime.
Subscribe to NewsletterManaging permissions in HubSpot is critical as your SaaS team scales. Here's what you need to know:
- Why it matters: Poor permission management risks data breaches, inefficiencies, and unnecessary costs. For example, too many Super Admins or excessive user access can hurt your account's Security Health Score.
- Key takeaway: Use Role-Based Access Control (RBAC) and the principle of least privilege to ensure users only access what they need.
- Tools to streamline: Leverage Permission Sets in Enterprise plans for standardized onboarding and View-Only Seats for cost-effective access.
- Super Admin limits: Keep Super Admins to 2–3 for better security and compliance.
- Regular audits: Review permissions quarterly to align access with changing roles and new features.
This guide walks you through HubSpot’s permission system, from seat types to detailed configurations, to help you scale securely and efficiently.
STOP Data Breaches: How To Set Up HubSpot User Permissions And Quickly Add New Users to HubSpot
sbb-itb-69c96d1
How HubSpot's Permission System Works
HubSpot Seat Types and Permission Levels Comparison Guide
HubSpot's permission system is built on two main layers: seats and permissions. Seats determine which tools a user can access, while permissions define the specific actions they can take within those tools. Think of seats as the entry ticket and permissions as the rules for what you can do once you're inside.
As of March 5, 2024, all users on Starter, Professional, or Enterprise plans must have a designated seat. This seat acts as the license granting access to specific Hubs and features. Once assigned, you can fine-tune what users can do - like viewing, editing, deleting, or publishing data. This two-layered setup ensures flexibility and control.
One common misconception? Being a Super Admin doesn’t automatically grant access to paid features. For example, a Super Admin with a Core Seat won’t be able to use Sales Pro tools like Sequences or Playbooks unless they also have a Sales Seat. This separation keeps administrative control and feature access distinct.
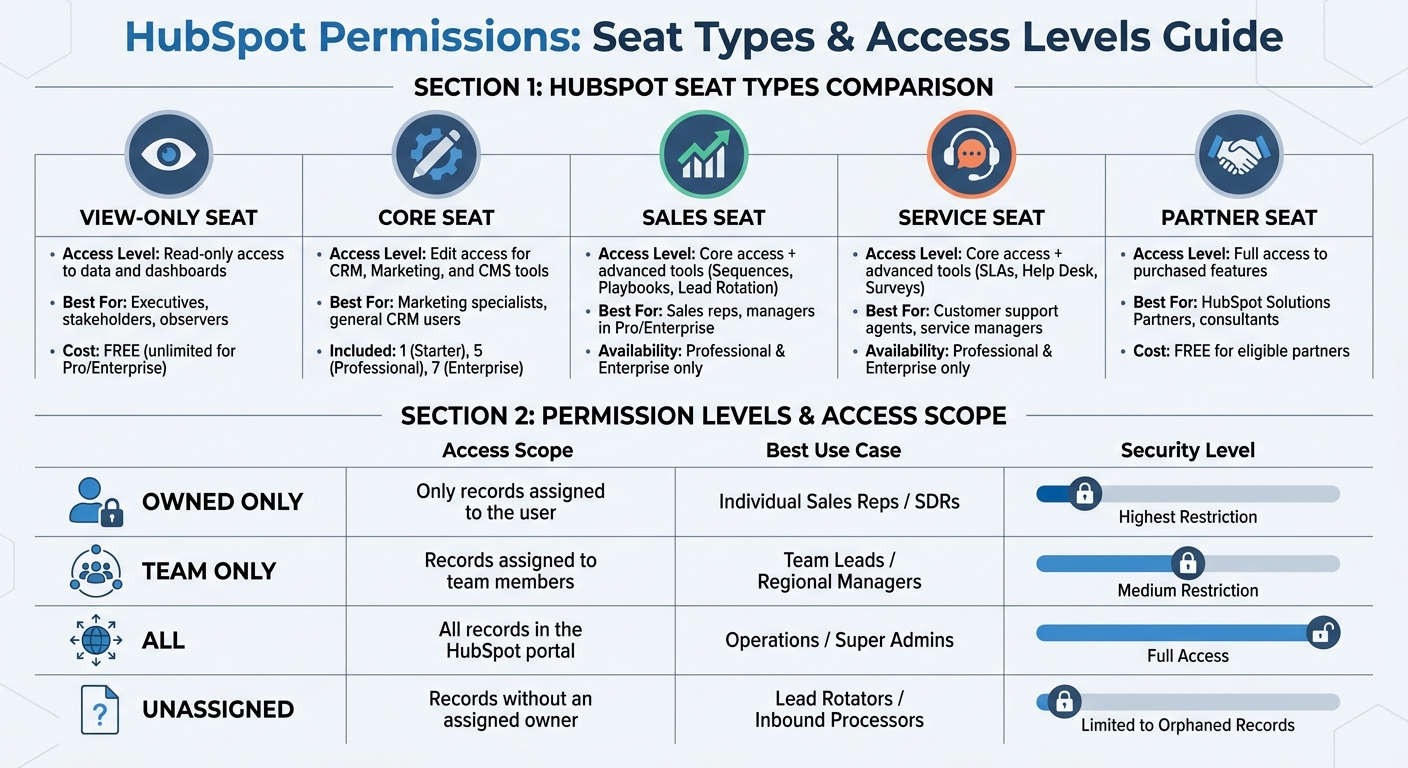
Seat Types and Access Levels
HubSpot provides several seat types tailored to different roles and workflows:
- Core Seats: These are included with your subscription (1 for Starter, 5 for Professional, 7 for Enterprise) and allow users to edit contacts, workflows, and emails across purchased Hubs.
- Sales and Service Seats: Available in Professional and Enterprise tiers, these seats unlock advanced tools. Sales Seats enable features like Sequences, Playbooks, and Lead Rotation, while Service Seats provide tools like SLAs, Help Desk automation, and Surveys.
- View-Only Seats: Free and unlimited for Professional or Enterprise accounts, these are perfect for executives or external partners who need to view dashboards and reports without making changes.
- Partner Seats: Free for eligible HubSpot Solutions Partners, these seats grant agencies full access to client tools without using the client's paid seat allotment.
| Seat Type | Access Level | Best For |
|---|---|---|
| View-Only | Read-only access to data and dashboards | Executives, stakeholders, observers |
| Core | Edit access for CRM, Marketing, and CMS tools | Marketing specialists, general CRM users |
| Sales | Core access + advanced tools (e.g., Sequences, Playbooks) | Sales reps, managers in Pro/Enterprise |
| Service | Core access + advanced tools (e.g., SLAs, Surveys) | Customer support agents, service managers |
| Partner | Full access to purchased features (free for agencies) | HubSpot Solutions Partners, consultants |
HubSpot also offers a "Transfer Seat" option, allowing you to reassign Core Seats during employee transitions without any additional cost.
Permission Sets vs. Individual Permissions
Permission Sets (available only in Enterprise plans) are templates that let you assign the same permissions to multiple users at once. This is especially helpful when onboarding teams like SDRs, Account Executives, or Marketing Managers who need consistent access.
On the other hand, Individual Permissions allow for custom configurations for a single user. These are available across all subscription tiers and work well for temporary or unique needs - like giving a contractor access to a specific report or granting an executive visibility into sensitive financial data.
Keep in mind that assigning a permission set to a user will override any previously assigned individual permissions. Super Admins can create up to 100 permission sets per account, while users with "Add and edit users" permissions can only assign sets that include permissions they already have.
For growing teams, permission sets streamline user management by applying consistent settings across roles. Use individual permissions when a user's needs deviate from the standard setup.
How to Configure Permission Sets
In HubSpot Enterprise, only Super Admins have the authority to create or edit permission sets. To get started, head to Settings > Users & Teams > Permission Sets, and then click on Create Permission Set. Give your set a clear, descriptive name like "SDR", "Marketing Manager", or "Customer Service Lead" to reflect its purpose.
HubSpot provides two options for setting up permissions: Start with a template, which offers pre-configured permissions based on typical roles, or Start from scratch, which gives you a blank slate to tailor permissions to your specific needs. Starting from scratch is ideal if you want total control, as no permissions are pre-assigned, allowing you to carefully select only what’s required. Once you've configured permissions across CRM, Marketing, Sales, Service, and Commerce, you can either assign the set immediately or save it for later use.
Each HubSpot account can support up to 100 permission sets. You can even clone existing sets to create variations like "Junior SDR" or "Senior SDR." To make bulk assignments easier, use the More > Assign Permission Set option to quickly apply templates across multiple users. This approach simplifies the process of creating role-specific templates that align with your team’s workflow, often managed through HubSpot RevOps support.
Creating Role-Based Permission Templates
Once your permission sets are configured, you can build templates tailored to specific roles. For example, an SDR might need "View" and "Edit" permissions for Contacts and Deals but only for records they own. Meanwhile, a Marketing Manager may require "Edit" access for blog posts and landing pages, but "Publish" permissions should be restricted to senior team members.
When designing these templates, adjust permissions across four key areas: View, Edit, Delete, and Communicate. For sales teams, setting permissions to "Owned Only" ensures reps can only access records they own, preventing them from viewing or exporting the entire database. A real-world example: In April 2026, RevPartners shared how a sales team configured "Owned Only" deal permissions for their California and New York teams. This setup stopped reps in one region from accessing deal details from another, eliminating "lead poaching".
For marketing teams, you can enable "Draft Only" publishing for junior staff to ensure a manager reviews content before it goes live. Additionally, restricting "Bulk Delete" and "Export" for non-admin roles helps prevent accidental data loss or unauthorized data sharing.
Applying Least Privilege Access
Once role-specific permissions are defined, refine them further by applying the principle of least privilege. This means granting users access only to what’s absolutely necessary for their role. For example, SDRs can be limited to "Owned Only" access for Contacts, Companies, and Deals, ensuring they can’t view records assigned to other reps.
To control access to unassigned records, toggle the "Unassigned Record" checkbox. This prevents users from accessing data that doesn’t have a designated owner. For Business Analysts, you might grant "View" access to CRM records while restricting "Edit" access to reporting tools, allowing them to analyze data without altering it.
For marketing and website tools, separate "Edit" and "Publish" permissions. For instance, junior marketers can draft and edit content, but only managers should have the ability to publish it live. Disabling "Export without approval" for non-admin roles can also safeguard sensitive lead data. As HubSpot Expert Grégoire Bolnot advises:
"Grant minimum necessary access: Only allow users access to the features and data they need to perform their role".
| Permission Level | Access Scope | Best Use Case for SaaS Teams |
|---|---|---|
| Owned Only | Only records assigned to the user | Individual Sales Reps / SDRs |
| Team Only | Records assigned to team members | Team Leads / Regional Managers |
| All | All records in the HubSpot portal | Operations / Super Admins |
| Unassigned | Records without an assigned owner | Lead Rotators / Inbound Processors |
Keep in mind that permission updates can take up to five minutes to take effect across HubSpot’s systems. Users will also need to log out and back in for the changes to apply. To ensure consistency, use the "Compare access" feature to review differences between users or permission sets.
Setting Permissions for Specific HubSpot Modules
Once you've established permission sets, you can fine-tune access by configuring detailed module and record-level permissions to ensure users only interact with the data and tools they genuinely need.
Record-Level Permissions
HubSpot's role-based templates allow you to adjust access at both record and module levels. Permissions can be customized for each CRM object: Contacts, Companies, Deals, Tickets, and Custom Objects (available in Enterprise accounts). For each object, you can define specific access levels: View, Edit, Delete, Create, and Merge.
The scope of access determines which records users can interact with:
- "All": Grants access to every record of a specific type.
- "Their team's": Restricts access to records owned by the user or their team members (available in Professional and Enterprise accounts).
- "Their": Limits access to records the user personally owns, based on ownership properties.
- "Unassigned": Allows users to manage records without an assigned owner, which is helpful for shared lead pools.
For teams managing sensitive customer data, pipeline stage restrictions offer an extra layer of control. For example, you can lock specific stages - like "Closed Won" or "Legal Review" - to prevent changes by anyone other than Super Admins or designated users. This helps preserve historical data for audits and avoids accidental edits to finalized contracts.
HubSpot also supports activity-level security, enabling you to grant a user access to a record while restricting visibility of associated notes, call logs, or meetings. To manage who can log emails or calls to specific records, adjust the "Communicate" permission.
| Permission Type | Scope Options | Example Use Case |
|---|---|---|
| View | All, Team's, Owned, Unassigned | Limit SDRs to their assigned leads. |
| Edit | All, Team's, Owned, None | Allow account managers to edit only their accounts. |
| Delete | All, Team's, Owned, None | Prevent data loss by setting this to "None" for most users. |
| Merge | All, Team's, Owned, None | Restrict merging to data specialists to maintain data accuracy. |
| Communicate | All, Team's, Owned, None | Control who can log calls or emails to specific records. |
To reduce risks like unauthorized data sharing, disable "Export without approval" and "Bulk delete" for standard users. You can also configure permissions for adding, editing, or deleting associations between records, ensuring data remains properly linked. Use the "Compare access" feature to review and contrast permissions between users or sets.
Beyond CRM objects, HubSpot offers additional permissions for other modules to align with team-specific responsibilities.
Module-Specific Permissions
HubSpot extends its permission controls to other modules, allowing tailored access for different teams. For example, marketing teams can have "Edit" and "Publish" permissions separated for content types like blog posts, emails, landing pages, and social media. This ensures junior team members can draft content, but publishing requires managerial approval.
Sales tools such as Sequences, Playbooks, and Forecasts can be restricted to "Owned Only", protecting sensitive deal information. For example, if your sales teams in California and New York share the same portal, setting deal permissions to "Owned Only" ensures reps from one region can't access or export deal data from another.
Enterprise accounts offer property-level restrictions, allowing you to hide fields like social security numbers or deal values from users who don't need access. Additionally, permissions for Commerce features - such as managing payments, subscriptions, and invoices - can be limited to finance team members to prevent unauthorized refunds or subscription cancellations.
For teams using tools like Breeze AI, permissions must be manually enabled. Assigning a "Reviewer" role ensures AI-generated content is reviewed by a human before publication. If your account handles HIPAA-protected data, AI-generated "Deal Insights" (e.g., risks or buyer goals) will be disabled automatically.
Keep in mind, permission inheritance means users assigned to multiple teams can access records linked to any of their teams. Also, note that permission updates may take up to five minutes to take effect, and users might need to log out and back in for changes to apply.
Managing Permissions as Your SaaS Team Grows
As your SaaS team expands across regions and departments, managing permissions becomes increasingly complex. Without a structured approach, you risk security gaps, especially when employees shift roles or leave the company. To avoid these pitfalls, focus on standardizing roles and automating processes rather than manually configuring permissions for every new hire. Keep the number of Super Admins as low as possible, and apply the principle of least privilege - granting each user only the access they need for their specific role.
Automating User Onboarding and Offboarding
To streamline onboarding, use Permission Sets (available in Enterprise accounts) and role templates. These reusable templates enable you to assign predefined permissions, like "Sales Rep" or "Marketing Manager", to multiple users without configuring each one individually. Enterprise accounts allow up to 100 unique permission sets per account, making this approach scalable as your team grows.
For Professional and Enterprise users, Presets simplify workspace setup by automating default settings like dashboards, language preferences, and email signatures. Additionally, the bulk editing feature in "Users & Teams" allows you to adjust permissions or seat types for multiple users at once, saving time during large-scale expansions.
When offboarding employees, conduct quarterly permission audits to ensure access is removed for those who have left the company or changed roles. This proactive approach minimizes the risk of outdated permissions compromising security.
Organizing users into teams further enhances your ability to manage permissions effectively.
Using Teams for Permission Inheritance
HubSpot's Teams feature lets you group users into parent and child teams, creating a hierarchy that simplifies access management. For instance, you could have a "Global Sales" parent team with child teams like "Sales - North America" and "Sales - EMEA". Parent teams can view records owned by their child teams, but child teams cannot access records owned by the parent team.
Each user is assigned one Main Team, which determines their reporting, record views, and routing rules. Users can also belong to multiple Extra Teams to gain access to additional records and content without altering their primary reporting structure. This setup is particularly helpful for cross-functional roles, such as a product marketer who needs visibility into both marketing campaigns and sales activities.
By setting permissions to "Team only", you can restrict record visibility so users see only the data relevant to their specific team or region. The "HubSpot team" property automatically populates with the record owner's main team, keeping data organized without manual input.
"Utilizing permission sets and teams can help businesses with overlapping or regional departments from emailing or communicating with contacts outside of their region or department".
| Feature | Main Team | Extra Team |
|---|---|---|
| Primary Purpose | Reporting, routing, and default record views. | Supplemental access to records and content. |
| Reporting | Included in team-based reports. | Excluded from team reports. |
| Routing | Included in conversation/workflow routing. | Excluded from routing and rotation rules. |
| Visibility | Can view team-specific custom sidebars. | Cannot view team-specific custom sidebars. |
Auditing and Updating Permissions
As your team grows, keeping access settings secure requires regular audits and updates. By sticking to principles like Role-Based Access Control (RBAC) and least privilege, you can ensure permissions remain aligned with your team’s evolving roles. Without consistent reviews, your once-organized permission structure can become messy, especially as new features are added. Nearly 60% of data breaches are linked to compromised access privileges, making this practice a must for security.
Running Regular Permission Audits
Plan to review permissions on a quarterly basis to catch potential risks early. Start by examining your list of Super Admins. According to CRM by RSM:
"If you have more than three or four [Super Admins], that's too many. We regularly see portals with 10+ super admins because it was easier to grant full access than figure out the right permission level."
Next, review user activity. Flag accounts that have been inactive for over 90 days and deactivate them to safeguard activity logs while minimizing exposure. After that, compare each role’s permissions with their actual responsibilities. For instance, you may discover that sales team members have unnecessary export permissions, or that marketing staff have bulk delete rights that could pose risks to your data.
Leverage tools like HubSpot's Security Health Score, located in the Security Center, to identify vulnerabilities such as low two-factor authentication adoption or an excessive number of privileged accounts. Research shows that organizations conducting regular security evaluations are 60% less likely to face data breaches, and those auditing quarterly see 40% fewer access-related incidents compared to annual reviews.
Once you’ve identified issues, update permissions immediately to match current needs and features.
Adjusting Permissions for New Features
Audits are the perfect time to address permissions for recently introduced tools and integrations. Keep in mind that HubSpot doesn’t automatically restrict new features when they’re rolled out. For example, when tools like Breeze AI or Content Remix are launched, permissions must be manually adjusted to avoid unintended access. For Breeze AI, assign a "Reviewer" role to a human manager before enabling generative AI access to ensure oversight of customer-facing content.
Additionally, review your "Private Apps" and "Connected Apps" every quarter to confirm they only have the necessary scopes. For example, instead of granting full portal access, use specific permissions like "Deals: Write." If you’re still using legacy API keys, migrate to Private Apps immediately, as legacy keys provide unrestricted access to your portal.
Super Admin Management and Security
When it comes to securing your HubSpot portal, managing Super Admin access is one of the most critical steps. This role carries the highest level of permissions, allowing actions like bulk data exports, integration updates, and billing modifications - often without requiring confirmation prompts. Because of the potential risks, it’s crucial to tightly control who has this access, especially to meet compliance standards like GDPR and SOC 2.
Super Admin Role Guidelines
To minimize risk while maintaining operational efficiency, limit your portal to just two or three Super Admins. Having only one creates a vulnerability if that individual becomes unavailable, while having more than three or four significantly increases security risks. As CRM by RSM points out:
"If you have more than three or four [Super Admins], that's too many. We regularly see portals with 10+ super admins because it was easier to grant full access than figure out the right permission level."
A good practice is to assign one primary administrator, one backup, and possibly one IT or Security representative. For everyone else, use role-based permissions tailored to their responsibilities. For instance, if someone only manages workflows or custom properties, they should hold a standard "Admin" role instead of full Super Admin access.
Additionally, enforce two-factor authentication (2FA) for all Super Admin accounts immediately. Regularly review admin activity and deactivate accounts that have been inactive for over 90 days. These measures, combined with proper role assignments, significantly enhance your portal’s security.
Monitoring Security Health Score
HubSpot's Security Center offers a Security Health Score - graded from A to F - that evaluates your portal's risk level. Factors like the number of Super Admins and 2FA adoption directly impact this score. Portals with more than three to five Super Admins often see their score drop due to heightened vulnerability. Make it a habit to review this score monthly and address any flagged issues promptly.
The Security Center also provides "High-Risk Action" alerts for activities like unauthorized bulk data exports or unexpected integration changes. Regularly review these alerts and investigate any suspicious activity immediately. Pair this with quarterly reviews of the Audit Log to maintain a clear record of changes to settings, permissions, or records. This documentation is not only helpful for troubleshooting but also critical for demonstrating compliance during SOC 2 or GDPR audits.
Wrapping Up
Managing HubSpot permissions for a growing SaaS team takes thoughtful organization and ongoing attention. The key is building role-based permission sets that match actual responsibilities rather than just job titles. Using reusable role templates - like those for SDRs or Marketing Managers - helps maintain consistency and avoids granting unnecessary access.
The principle of least privilege is a must: "Give each user the minimum level of access required to perform their job". This reduces the risks of accidental data loss, unauthorized exports, or exposure of sensitive details, such as pricing strategies or strategic plans. Features like "Owned Only" or "Team Only" access can also prevent lead poaching and ensure accountability within teams. Together, these steps lay the groundwork for effective permission management.
Regular audits are just as important. As roles shift with team changes, permissions should be reviewed every 3–6 months. Use tools like the Audit Log to track changes, troubleshoot issues, and stay compliant.
Another critical step is limiting the number of Super Admins. Experts suggest having only two Super Admins to balance redundancy with security. Exceeding three to five can hurt your Security Health Score. To maintain strong security, monitor this score quarterly in the Security Center, enforce two-factor authentication for Super Admin accounts, and treat permission management as a core part of your RevOps strategy.
When permissions are thoughtfully structured, regularly reviewed, and tailored to your team’s needs, HubSpot transforms into a powerful tool for scalable growth - without unnecessary security risks or operational headaches.
For more advanced tips on refining your HubSpot permissions and strengthening your RevOps strategy, check out Vestal Hub at https://vestalhub.com.
FAQs
How do I choose the right seat type for each role?
When assigning seats, align the type with each role's responsibilities and access requirements. For roles requiring full CRM access, opt for broader permissions such as "Super Admin". On the other hand, users who only need to view data can be assigned free "View-Only" seats. To simplify this process, create permission templates tailored to specific roles. This approach ensures teams have the right access while keeping security intact.
When should I use a permission set vs individual permissions?
Using a permission set is a smart way to assign a predefined group of permissions to users who share similar roles. This approach simplifies access management and ensures consistency across your SaaS team. It's especially useful for larger teams where managing individual permissions for each user can become overwhelming.
On the other hand, individual permissions are better suited for granting specific access on a case-by-case basis. They provide more precise control but can be harder to manage and scale as your team grows.
By balancing these two methods, you can tailor access to meet both team-wide and individual needs effectively.
What’s the fastest way to audit and fix risky access?
To tighten access controls in HubSpot, begin with a permissions review. Your first priority should be identifying Super Admins - aim to limit this role to just 2-3 individuals. For everyone else, assign roles based on the principle of least privilege, ensuring users only have access to what they need.
Here are some steps to streamline the process:
- Implement role-based access controls to manage user permissions effectively.
- Use audit logs and security health scores to identify permissions that may be too broad.
- Regularly update user roles and remove inactive accounts to minimize unnecessary access.
- Keep a record of all changes to maintain compliance and track adjustments over time.
For best results, conduct quarterly audits. This routine helps ensure your access controls stay aligned with security best practices and reduces the risk of unauthorized access.