

Get insights like this delivered to your inbox
Join 2,500+ GTM professionals. No spam, unsubscribe anytime.
Subscribe to NewsletterA disconnected HubSpot CRM can create chaos for your teams. Missed handoffs, manual data entry, and siloed information slow everything down. Custom HubSpot integrations solve these problems by connecting your CRM to tools like Xero, Monday.com, or Slack, automating tasks and boosting sales efficiency by 25%.
Here’s how to create an integration that works for your business:
- Start with a HubSpot Developer Account: Set up a sandbox environment to test integrations safely.
- Map Data Flows: Identify what needs syncing - Contacts, Deals, or Custom Objects - and align fields across systems.
- Secure Authentication: Use OAuth for secure API access, managing tokens and permissions carefully.
- Choose the Right Method: Options include pre-built connectors, middleware platforms like Zapier, or custom API integrations for full control.
- Build and Test: Follow best practices like validating webhook signatures, handling API limits, and testing in sandbox environments.
- Deploy and Monitor: Use tools like Redis for token management, monitor API usage, and optimize performance with bulk endpoints and caching.
Custom integrations require planning, coding, and ongoing maintenance, but the payoff is worth it. Whether you’re automating workflows or syncing data in real-time, this guide will help you build a reliable solution.
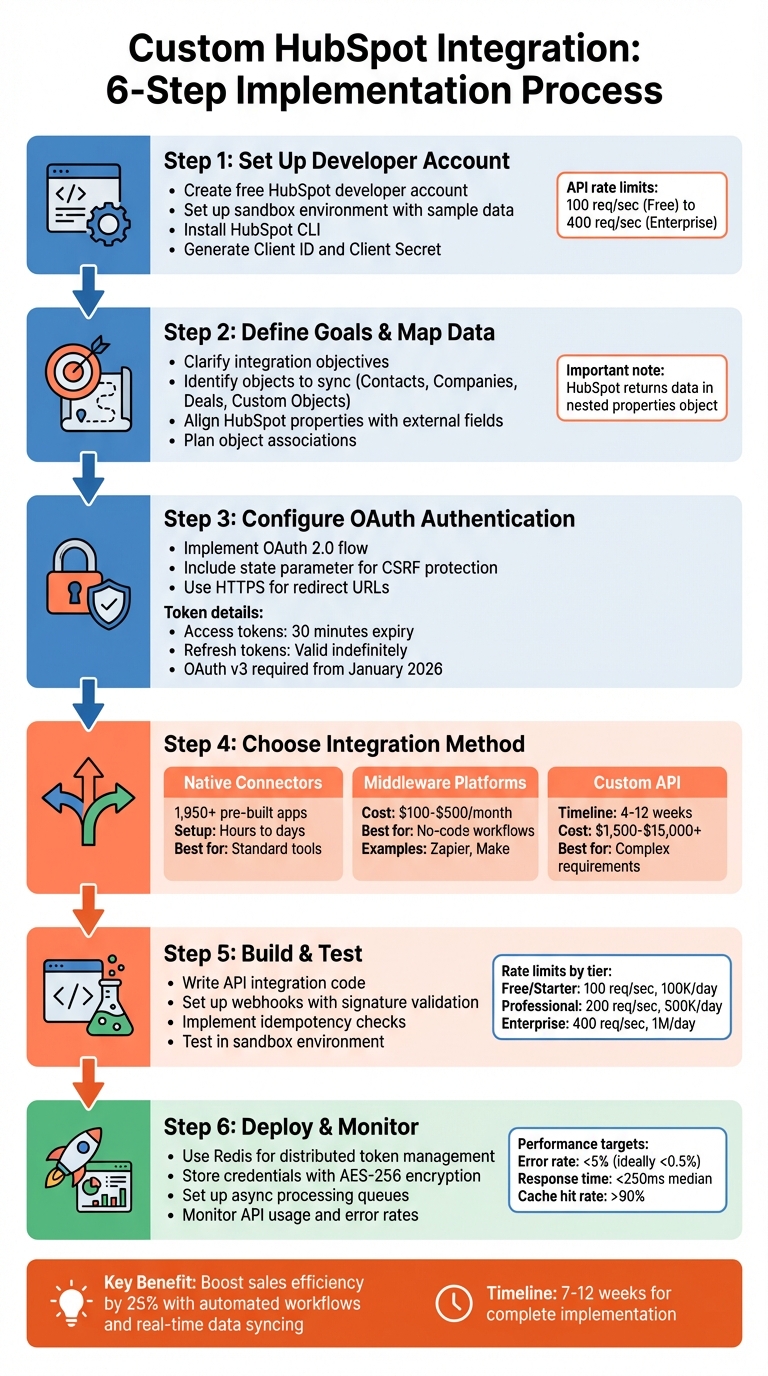
6-Step Custom HubSpot Integration Implementation Process
How To Use HubSpot API in 2026 (Step-by-Step Guide)

sbb-itb-69c96d1
Planning and Prerequisites
Laying the groundwork for your integration involves setting up your development environment, mapping out data flows, and understanding HubSpot's authentication process.
Setting Up a HubSpot Developer Account
The first step is creating a free HubSpot developer account through the HubSpot Developer Portal. This account gives you two Super Admin core seats with full CRM access and the tools needed to build and test integrations - without touching live production data.
Once your account is set up, create a sandbox environment. This sandbox comes pre-loaded with sample data, including contacts, companies, and deals. It’s a safe space for testing your integration. Afterward, install the HubSpot CLI on your machine and authenticate using either hs get-started or hs init to kick off your first project.
Next, navigate to the "Apps" section in the developer portal and click "Create app" to generate the Client ID and Client Secret needed for OAuth authentication. Define the necessary scopes - like crm.objects.contacts.read - to specify the data your integration will access. Keep in mind that HubSpot’s API rate limits depend on your subscription plan, ranging from 100 requests per second for Free/Starter accounts to 400 requests per second for Enterprise accounts.
Defining Integration Goals and Data Mapping
Start by clarifying your integration goals. Are you automating data entry? Centralizing information? Extending HubSpot’s capabilities? For instance, analyzing how many deals are impacted by missing integrations - and estimating their financial impact - can help justify your project.
Next, map out the data flow between HubSpot and your external system. Identify the objects you’ll need to sync, such as Contacts, Companies, Deals, Tickets, or Custom Objects. Be sure to align HubSpot properties with your external database fields. HubSpot often returns data in a nested properties object, so you may need to normalize fields. For example, the hs_additional_emails field stores multiple email addresses as a semicolon-separated string that must be split programmatically.
Also, plan how to link objects, such as associating a Contact with a specific Company or Deal. Decide whether to use the Properties API for dynamic property discovery or let users manually configure custom field syncing. Keep in mind that HubSpot doesn’t return all fields by default - you’ll need to explicitly request them using the properties query parameter.
OAuth Authentication Requirements
HubSpot no longer supports API keys, so new integrations must use OAuth or Private App access tokens. OAuth is mandatory for apps designed for multiple HubSpot accounts or those listed on the HubSpot Marketplace.
HubSpot’s OAuth v3 endpoints align with OAuth 2.1 standards, requiring client_id and client_secret in the request body as application/x-www-form-urlencoded. This ensures sensitive details aren’t exposed in server logs. Access tokens expire every 30 minutes (1,800 seconds), while refresh tokens remain valid indefinitely unless revoked.
"The gap between a working integration and a production-ready one usually comes down to how well you handle tokens." – HubSpot Developer Blog
Ensure your production redirect URL uses HTTPS (IP addresses aren’t allowed), and verify that users installing your app have the necessary permissions, such as Super Admin or HubSpot Marketplace Access. Include a unique state parameter in your authorization URL to guard against cross-site request forgery attacks. To avoid service disruptions, refresh access tokens about five minutes before they expire instead of waiting for a 401 Unauthorized error.
Once you’ve completed these steps, you’ll be ready to choose the integration method that best fits your needs in the next section.
Choosing Your Integration Method
Once you've laid the groundwork, the next step is picking the right integration method to bring your data systems together. The choice depends on factors like your technical expertise, project timeline, and the complexity of your data.
Native HubSpot Connectors
HubSpot's App Marketplace has over 1,950 pre-built connectors. These are perfect for integrating widely-used tools like Gmail, Zoom, QuickBooks, or Slack. Setup is quick - usually taking just hours or days. The best part? You don’t have to worry about maintenance. Updates, API changes, and bug fixes are all handled by HubSpot or the app provider.
Native connectors are ideal if your data structure aligns well with HubSpot's standard fields. For example, syncing contacts, companies, and deals without much customization is straightforward. However, these connectors have their limits. You can’t tweak data transformations or add custom logic. And if your HubSpot setup uses custom objects to handle complex relationships, native connectors likely won’t support them. For more tailored data handling, middleware platforms might be a better option.
Middleware Platforms
Middleware platforms like Zapier or Make offer no-code solutions to connect HubSpot with other tools. They’re designed for users who need to create workflows without technical expertise. For instance, you could set up a process where submitting a form creates a deal in HubSpot and sends a Slack notification. Pricing typically ranges from $100 to $500 per month, depending on how many tasks you need.
These platforms are a great fit for mid-sized companies that need more flexibility than native connectors but don’t have in-house developers. Middleware allows you to add conditional logic, filter records, and chain multiple actions together. That said, they do have limitations. High-volume syncs or real-time, two-way updates can push these platforms beyond their performance limits. If you need complete control over your data flows, custom API integrations are the way to go.
Custom API Integrations
Custom API integrations give you the ultimate level of control. With this method, you write the code to connect HubSpot to your system. It’s the best choice for handling proprietary databases, legacy ERP platforms, complex data transformations, or custom objects.
"The fundamental difference lies in flexibility versus speed to deployment." – Tyler Washington, Aptitude8
Development timelines for custom APIs range from 4 to 12 weeks. Costs start at $1,500 for basic one-way syncs and can go beyond $15,000 for enterprise-level ERP integrations. While this approach requires more resources, it’s essential for scaling complex B2B SaaS architectures or meeting strict compliance standards. However, keep in mind that custom APIs need ongoing maintenance, like managing token refreshes, handling rate limits, and adapting to API updates.
Many enterprise teams use a mix of these methods: native connectors for standard processes, middleware for quick automations, and custom APIs for critical systems. Before diving into a custom build, assess how much manual data entry is costing your team. For example, if a 10-person team is losing $125,000 to $300,000 annually to manual processes, investing in custom development could pay off in just a few months.
Building the Integration
Now that you've picked your integration method, it's time to dive into the building process. This phase involves setting up secure authentication, writing code to interact with HubSpot's APIs, and thoroughly testing everything to ensure a smooth launch.
Configuring OAuth Authentication
HubSpot uses the OAuth 2.0 Authorization Code flow to secure API access. This process involves four key steps: redirecting users to grant consent, obtaining an authorization code, and exchanging it for tokens .
To start, create a Public App in the HubSpot Developer Portal to get your Client ID and Client Secret. When building your authorization URL, include these parameters:
| Parameter | Required | Description |
|---|---|---|
client_id |
Yes | Your app's unique identifier, found in the HubSpot Developer Portal . |
scope |
Yes | Space-separated list of permissions, such as contacts%20deals . |
redirect_uri |
Yes | The URL users are sent to after approval; must use https in production . |
state |
No | A unique string for maintaining state and preventing CSRF attacks . |
optional_scope |
No | Scopes dropped if the HubSpot portal lacks access to certain products . |
Always include a unique state parameter. This nonce should be stored server-side and verified upon redirection to guard against CSRF attacks .
The OAuth flow generates three types of tokens:
- Authorization Code: Single-use token.
- Access Token: Short-lived, valid for 30 minutes.
- Refresh Token: Long-term token used to generate new access tokens .
Starting January 2026, you'll need to use OAuth v3 endpoints (e.g., /oauth/v3/token). These endpoints require sensitive parameters like client_id and client_secret to be included in the request body rather than query parameters, reducing the risk of exposure in server logs .
To protect these tokens, never store them in plain text. Use AES-256 encryption for database storage or a secrets manager like AWS Secrets Manager or HashiCorp Vault. Implement logic to refresh tokens before they expire, especially in multi-server environments. Tools like Redis and Redlock can help manage distributed caching and avoid multiple servers refreshing the same token simultaneously. If you encounter an invalid_grant error during token refresh, prompt the user to re-authorize the application instead of retrying automatically.
Once authentication is set up securely, you can move on to interacting with HubSpot's APIs to manage data.
Working with HubSpot APIs
With secure access in place, you can now use HubSpot's RESTful APIs to handle CRM data. When retrieving data, explicitly request the properties you need in the URL. If you don’t, only default properties will be returned. For advanced filtering and sorting, use the Search API (/search) instead of standard GET endpoints .
HubSpot's API rate limits depend on your account tier:
| Tier | Requests/Second | Requests/Day |
|---|---|---|
| Free/Starter | 100 | 100,000 |
| Professional | 200 | 500,000 |
| Enterprise | 400 | 1,000,000 |
For larger datasets, use cursor-based pagination with the after parameter. Keep in mind that search results are capped at 10,000 records per query, so plan your data retrieval carefully. For real-time updates, set up webhooks to get notifications about object changes. Validate the X-HubSpot-Signature-v3 header using HMAC SHA-256 with your app's Client Secret to prevent spoofing attacks. Reject webhook requests with timestamps older than 5 minutes to avoid replay attacks.
When validating webhook signatures, use crypto.timingSafeEqual for constant-time comparisons to guard against timing attacks. After receiving a webhook, respond with 200 OK immediately and process the payload asynchronously to prevent delivery timeouts .
Testing and Validating the Integration
Use sandbox environments for testing to avoid risks to your live environment. Review OAuth installation logs to quickly identify handshake issues . Simulate common failure scenarios like token refresh failures (401/403 errors), rate limiting (429 errors), and network timeouts.
Ensure idempotency by verifying that retrying a failed request doesn’t create duplicate data if the original request succeeded but timed out. Log all API requests, responses, and execution times to make debugging and performance tuning easier. Before launching, confirm your integration handles pagination properly, validates webhook signatures, and refreshes tokens proactively to avoid 401 errors.
"Always validate signatures before processing webhook data. Never trust incoming requests just because they hit your webhook endpoint." – HubSpot Developer Blog
Deploying and Scaling
To keep your integration ready for production, your hosting environment needs to handle more than just running code. It should also ensure scalability and security without hiccups.
Selecting a Hosting Environment
Your hosting setup must support distributed caching, secrets management, and asynchronous processing. For multi-tenant SaaS products, pick a host that offers Redis or Memcached. These tools help manage OAuth tokens across servers and prevent race conditions during token refreshes. Since HubSpot access tokens expire every 30 minutes, your infrastructure should handle automatic token refreshes seamlessly.
Store OAuth credentials securely using AES-256 encryption with tools like AWS Secrets Manager, Google Cloud Secret Manager, or HashiCorp Vault. To handle webhook ingestion or bulk data syncs, ensure your environment supports asynchronous processing through queueing systems like AWS SQS or RabbitMQ. This prevents timeouts and keeps operations smooth even during high traffic periods.
Create a staging environment that mirrors production to test integrations with HubSpot developer sandboxes before going live. Set HTTP client timeouts between 10–30 seconds to avoid hanging during network issues. Use distributed locking with Redis SET NX commands or the Redlock algorithm to ensure only one server handles token refreshes at a time. Additionally, implement dead-letter queues (DLQ) to capture failed webhook deliveries or background sync jobs for troubleshooting.
Once your hosting setup is solid, focus on monitoring tools to keep your integration running efficiently.
Monitoring and Optimizing Performance
After deployment, continuous monitoring is critical to ensure your integration performs well and avoids issues like API throttling or slow data processing.
Keep an eye on the X-HubSpot-RateLimit-Remaining response header to adjust call frequency and avoid HTTP 429 errors. Set up automated alerts when daily request quotas hit 80% usage to prevent interruptions from throttling. To maintain certification for the HubSpot Marketplace, keep your error rate below 5% - ideally under 0.5% for optimal performance.
Monitor the median latency of key endpoints; aim for response times under 250ms. Use circuit breakers to pause requests temporarily if an endpoint repeatedly returns 5xx errors or 429s, preventing system-wide failures. Track cache hit/miss rates - achieving a hit rate above 90% can reduce backend traffic by up to 70%. Schedule bulk data syncs during low-traffic times to improve throughput by as much as 35%. To further optimize, use batch endpoints for contacts, cutting API call volume by up to 90%, and compress payloads over 100KB with gzip to shrink transfer sizes by 70%.
Conclusion
Building custom HubSpot integrations is much more than just making API calls - it’s about creating a system that’s reliable, scalable, and tailored to your specific needs. As Roopendra Talekar, Engineering Lead, aptly describes:
"The HTTP request is the 10% visible above the water. The remaining 90% - authentication, pagination, rate limiting, data normalization, webhooks, and ongoing maintenance - lurks below the surface."
The process starts with careful planning and data mapping, followed by testing in a sandbox environment to ensure your approach is solid. During implementation, focus on best practices like using OAuth 2.0 for secure authentication, applying exponential backoff with jitter to handle rate limits, and verifying webhook signatures to maintain data integrity.
Once your integration is live, monitoring becomes essential. Track API metrics closely, keep error rates under 5%, and leverage bulk endpoints, such as the CRM Search API, to efficiently manage large datasets.
While the initial engineering effort can take 7–12 weeks, the payoff is worth it. Custom integrations provide flexibility and control that go beyond what native connectors offer. Whether you’re syncing financial data, automating workflows, or managing real-time operations, think of your integration as an evolving system that requires regular updates and maintenance. This ongoing commitment ensures it continues to meet your business's growing demands.
FAQs
Should I use a Private App token or OAuth?
The choice between the two largely depends on how you plan to use them. OAuth works best for scenarios involving multi-account integrations or public-facing applications. It provides multi-tenant support and stronger security measures, making it ideal for more complex setups. On the other hand, Private App tokens are better suited for single-account or internal purposes. They are easier to configure and don’t require the complexities of OAuth. If you need a scalable and secure solution, go with OAuth. For simpler, single-account access, Private App tokens will do the job effectively.
How do I prevent duplicate records during sync?
To prevent duplicate records during HubSpot syncs, it's best to use a unique identifier such as a custom property or external ID. Avoid relying on fields that can change, like domains. Implement a safe upsert process by searching for existing records before adding new ones. Be cautious with retries to avoid repeating actions, and make it a habit to audit your data regularly. This ensures your create/update processes remain accurate and your data stays clean and reliable.
What’s the best way to handle HubSpot rate limits?
To handle HubSpot's rate limits efficiently, implement exponential backoff for retries. This approach spaces out retry attempts when a limit is reached, reducing the risk of repeated failures. Use HubSpot's monitoring tools or custom dashboards to track API usage, allowing you to predict and adjust before hitting limits. Focus on critical tasks by separating essential operations from bulk queries. These methods help minimize errors, prevent bottlenecks, and keep your integrations running smoothly.