

Get insights like this delivered to your inbox
Join 2,500+ GTM professionals. No spam, unsubscribe anytime.
Subscribe to NewsletterHubSpot's default properties cover basics like name, email, and company size, but for B2B SaaS companies, custom properties are essential for tracking data such as product usage, subscription tiers, and buying signals. These tailored fields improve lead qualification, reporting accuracy, and workflow automation. This guide provides a step-by-step checklist to create and manage custom properties effectively.
Key Takeaways:
- Review Defaults First: Avoid duplicates by checking existing HubSpot properties like ARR or MRR before creating custom ones.
- Set Permissions & Plan: Ensure you have the right HubSpot plan (Professional or Enterprise for advanced features) and permissions.
- Design Custom Fields: Use appropriate field types - dropdowns for categories, numbers for comparisons, and date pickers for timelines.
- Organize & Audit: Group properties logically (e.g., "SaaS Metrics") and review fill rates to maintain clean data.
- Enhance Reporting & Automation: Use custom properties in reports and workflows to improve segmentation, lead scoring, and automation.
Why It Matters: Properly designed custom properties streamline operations, improve data accuracy, and enable better decision-making across sales, marketing, and support teams.
How To Customize CRM Properties in HubSpot | Strategic HubSpot Tutorial

Prerequisites for Setting Up Custom Properties
Before creating custom properties, it's essential to review the existing fields in your system. This step helps you avoid duplicate entries and keeps your data clean and organized. Here’s what you need to know before diving into custom property creation.
Review Existing Default Properties
HubSpot provides a set of default properties, such as ARR, MRR, ACV, and TCV, which are included in Sales Hub Professional and Enterprise plans. These default properties cover contacts, companies, and deals. According to Kyle Jepson from HubSpot, "Creating custom properties is key to tailoring the CRM to meet the needs of your business". However, the HubSpot Knowledge Base advises, "You should check whether a default property can meet your data requirements before creating a custom property".
Start by searching your property list in the settings. Default fields like contact name, email, company name, domain, deal amount, and stage often meet most requirements. If you create a custom field unnecessarily, it could lead to data silos and make reporting more complicated. Always confirm whether an existing property can fulfill your needs before adding a new one.
Check HubSpot Subscription and Permissions
Make sure you have the necessary permissions to create or edit properties. Super admins automatically have "Edit property settings" permissions. Other users may need these permissions to be granted. Also, verify your subscription plan. While all HubSpot plans support basic custom property creation, advanced features like Calculation, Rollup, and Property Sync are only available on Professional or Enterprise plans. If your account has been downgraded, you can still edit existing properties but won’t be able to create new ones.
Identify Key B2B SaaS Data Requirements
Pinpoint the data your business needs that isn’t already covered by the default properties. For B2B SaaS companies, this often includes details like subscription tiers, product usage metrics, renewal dates, feature preferences, or secondary roles. Think about how you’ll use the data, not just what you want to store.
Choosing the right field type is crucial. For example:
- Use Number fields for data that requires comparisons (e.g., more than 100 logins).
- Opt for Dropdowns or Multiple checkboxes for segmentation purposes.
- Select Multiple checkboxes if customers can belong to several segments simultaneously.
Proper planning ensures you pick the right field type from the start, saving you from having to rebuild properties later after data has already been entered.
Step-by-Step Guide to Creating Custom Properties
Step-by-Step Guide to Creating Custom HubSpot Properties
Navigate to Properties Settings
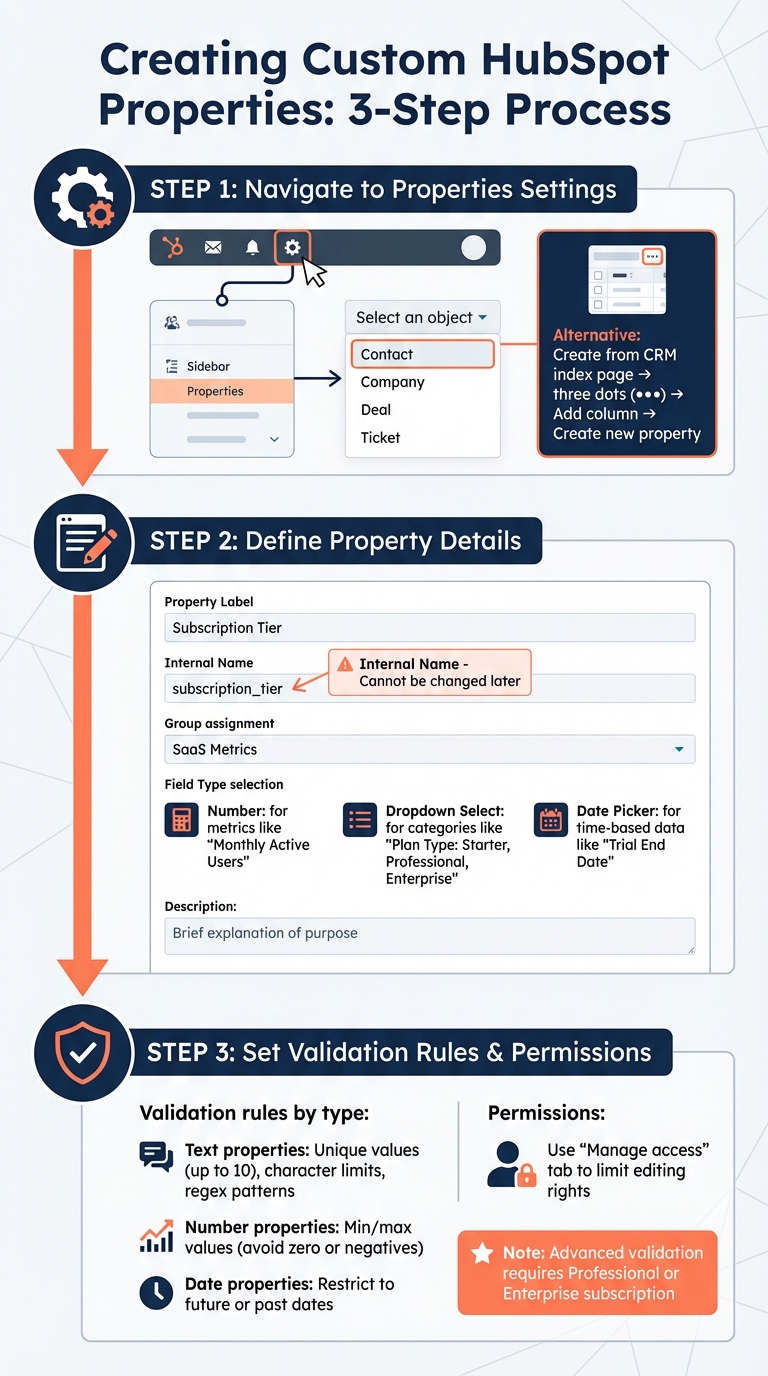
To get started, click the settings icon in the top navigation bar of your HubSpot account. From the left sidebar menu, choose Properties. Before proceeding to Create property, use the Select an object dropdown menu to pick the record type you're working with - Contact, Company, Deal, or Ticket.
Alternatively, you can create a property directly from a CRM index page, like Companies. Just click the three vertical dots, select Add column, and then choose Create new property. Once you've accessed the property creation screen, you're ready to define the details.
Define the Property Details
Start by setting a clear Property Label (e.g., "Subscription Tier" or "Renewal Date") and an Internal Name (e.g., subscription_tier). The internal name is limited to 100 characters and cannot be changed later, so stick to a consistent naming style, such as lowercase with underscores.
Next, assign the property to a Group to keep related fields organized. For example, B2B SaaS teams might use groups like "SaaS Metrics" or "Product Usage" to simplify data management. Then, select the appropriate Field Type based on the kind of data you’re collecting. Here are some examples:
- Use Number fields for metrics like "Monthly Active Users."
- Opt for Dropdown Select for standardized categories, such as "Plan Type: Starter, Professional, Enterprise."
- Choose Date Picker for time-based data, like "Trial End Date".
Lastly, use the Description field to provide a brief explanation of the property's purpose. This helps ensure clarity, especially when multiple team members are managing data.
Set Validation Rules and Permissions
Once you've defined the property details, it's time to establish validation rules and permissions to maintain data accuracy. Validation rules ensure that data entered meets specific criteria:
- For text properties, you can enforce unique values (up to 10 per object), set character limits, or use regular expressions for formats like SKU codes.
- For number properties, set minimum and maximum values to avoid errors like a "Seat Count" of zero or negative numbers.
- For date properties, you can restrict entries to future dates (e.g., for renewal dates) or past dates (e.g., for contract start dates).
These rules apply during manual entry, editing, or imports, but they won’t affect workflows, chatflows, or legacy forms. For sensitive data, such as revenue figures, use the Manage access tab to limit editing rights to Super Admins or specific teams. If you need advanced validation, like regex patterns, note that this feature is available only with a Professional or Enterprise subscription.
Organizing and Managing Custom Properties
Organize Properties into Groups
Grouping properties is a smart way to keep your custom fields organized for different object types like Contacts, Companies, Deals, or Tickets. By creating property groups, you can separate your business-specific data from the default fields that come preloaded in HubSpot. Without these groups, your custom data can easily get buried among the 200+ default properties HubSpot accounts typically include, which are already sorted into five default groups.
MFrankJohnson, a HubSpot Thought Leader, explains it well:
"Now imagine that those 200 default HubSpot properties are all sorted alphabetically within their property groups and we wanted to add some custom properties, BUT didn't have the option to segregate them from the default HubSpot properties. See the potential mess?"
To avoid this chaos, consider organizing properties into groups based on departments or processes. For example, B2B SaaS teams might create groups like "Billing Information", "Product Engagement", "Lead Qualification", or "Customer Success Metrics". If you're integrating platforms like Salesforce or Shopify, they’ll often create their own property groups, making it easier to distinguish synced data from HubSpot’s native fields. If your CRM setup needs tidying up, you can select multiple properties in the settings table and use the "+ Add to group" option to move them all at once. Afterward, simplify your fields further by cloning or editing them as needed.
Clone or Edit Existing Properties
Once your groups are in place, you can streamline your custom fields by cloning or editing existing properties. The Clone feature is especially useful for duplicating properties with complex validation rules, saving you the trouble of building them from scratch. Editing is straightforward, but keep in mind that while you can update details like the Property Label (the name users see), the assigned group, and the description, the Internal Name stays locked.
The Internal Name plays a critical role in integrations and APIs, so even if you rename a property for clarity, the technical reference remains unchanged. This ensures that your integrations continue to function without interruption.
Audit and Maintain Property Data
After organizing and refining your properties, regular audits are key to maintaining clean and useful data. Start by reviewing the "Fill Rate" for each property, which indicates the percentage of records that actually have a value entered. If a property has a low fill rate, it might be unnecessary or not used as intended.
Before you archive or delete any property, always check the "Usages" tab to see where it’s being used - whether in workflows, reports, or lists. This step is crucial to avoid breaking active automations or dashboards. For a deeper dive into property changes, head to Settings > Data Management > Audit Logs. Here, you can track who made changes to property values or settings. Keep in mind that archived properties can be recovered within 90 days if needed.
Taking the time to organize, refine, and audit your properties ensures smoother reporting and automation, setting the stage for the improvements discussed in the next section.
sbb-itb-69c96d1
Using Custom Properties for Reporting and Automation
Add Properties to Reports and Dashboards
Custom properties let you track specific B2B data points that HubSpot’s default fields might not cover - like internal account management roles or niche industry metrics. This added flexibility allows you to include these properties in single object reports, funnel reports, the custom report builder, and attribution reports (contact, deal create, and revenue). Keep in mind, custom reports are available only with a Professional or Enterprise subscription.
When setting up custom properties, choose the right field types for your needs. For example, use Number fields for comparative filters (e.g., "Number of Properties Managed > 50") and Date fields for time-based analysis. Dropdown Select or Multiple Checkboxes fields are helpful for maintaining consistency in reporting.
For broader insights, take advantage of calculation and rollup properties to automatically summarize data, like calculating the "Average Deal Amount per Contact". These features also require a Professional or Enterprise subscription. Additionally, smart properties powered by Breeze AI can convert qualitative data - like call transcripts or PDFs - into quantifiable fields for reporting. Keep in mind, each enrichment run uses HubSpot Credits.
But custom properties aren’t just about reporting - they’re also essential for automating workflows.
Automate Processes with Workflows
The insights you gain from custom property reports can directly power workflow automation. For example, workflows can be triggered when a custom property is updated, such as setting a "Project Start Date". These workflows can automatically update other custom property values for tasks like lead scoring, lifecycle stage updates, or data normalization. To ensure consistency, you can even sync custom properties between records - like copying a "Company Industry" value to all associated contacts.
Tyler Samani-Sprunk, Co-founder of Simple Strat, highlights the impact of such automation:
"By automating repetitive tasks, HubSpot workflows free up valuable time, allowing your team to focus on more important tasks, such as building relationships and closing deals."
To reduce errors, avoid free-form text fields, which are prone to typos that could disrupt workflows. You can also create if/then branches that adjust workflows based on custom property values, enabling tailored automation paths. Always test workflows to ensure they correctly apply your custom property criteria. Note that workflow access is typically tied to a Professional or Enterprise subscription.
In 2024, Cara Wood, Digital Marketing Manager at ShopPad, used a custom property tracking app installations to trigger a cross-sell workflow. This automation educated users about complementary apps and drove over 1,550 additional app installs in just one year. Similarly, Mark Whitlock, Marketing Manager at Golden Spiral, designed an MQL nurturing workflow based on custom lead status properties. The workflow, which included eight emails over 10 weeks, delivered two Sales Qualified Leads immediately after launch.
Best Practices for Managing Custom HubSpot Properties
Once you've set up and organized your custom properties in HubSpot, following these best practices will help maintain data accuracy and streamline your operations.
Use Consistent Naming Conventions
In HubSpot, each property has two identifiers: the Property Label (visible in the CRM) and the Internal Name (used for APIs and integrations). While you can edit labels at any time, internal names are locked once the property is saved. To make things easier for developers, stick to a consistent format for internal names - like lowercase with underscores (e.g., subscription_level or contract_renewal_date). Keep these names under 100 characters and avoid abbreviations in labels. For instance, use "Number of Properties Managed" instead of "Prop. Mngd."
The description field is another important tool. Use it to clearly define the purpose of each property. This not only helps avoid duplicates but also makes onboarding smoother for new team members. For better organization, group related properties together under categories like "Lead Qualification" or "Product Usage", so your settings menu stays easy to navigate.
Review and Optimize Properties Regularly
Conducting an annual audit of your HubSpot properties is a smart way to keep your CRM data clean and aligned with your business goals. During these reviews, check the fill rates for each property - the percentage of records with a value entered. Low fill rates might signal that certain properties are redundant or no longer useful, cluttering your system.
When you decide to archive or delete a property, HubSpot will flag any dependencies, like workflows, forms, or reports, that rely on it. This ensures you won't accidentally break something critical. Archived properties are stored for 90 days before permanent deletion, giving you time to restore them if needed. Once your properties are optimized, focus on selecting the most effective property types to further improve your CRM's functionality.
Choose Property Types Strategically
Selecting the right property type is crucial for accurate data filtering and reporting. For example, single-line text fields only allow exact match searches, which makes them less effective for categorizing data. Kyle Jepson, Senior Evangelist at HubSpot, advises against relying on single-line text for lists:
"Anytime you have a set list of options you want to select from, you want to create either a dropdown select or a multiple checkboxes property... someone might start abbreviating or using a different labeling convention, making Groundskeeper's CRM a disorganized mess."
For numeric data, such as filtering companies that manage more than 50 properties, use Number properties. Dropdown select and Multiple checkboxes properties ensure consistency and allow for precise segmentation in reports. Date picker fields are perfect for time-based filtering, offering options like "before", "after", or "between." To further enhance data quality, set validation rules on text and number fields. This catches errors at the point of entry, keeping your data clean and ready for automated workflows.
Conclusion
Custom properties transform HubSpot into a personalized CRM capable of tracking critical B2B SaaS metrics like product usage, user count, and project budgets. By stepping beyond the limitations of default fields, you establish a framework for more detailed segmentation, enabling precise marketing campaigns and targeted sales efforts. This level of customization not only enriches your data but also strengthens the foundation for maintaining reliable data quality.
Strong data integrity is essential for RevOps success. Structured field types, such as dropdowns and checkboxes, help minimize errors caused by typos or inconsistent labeling, keeping your CRM clean and efficient as your team grows. Tschanen Brandyberry from Kiwi Creative emphasizes the value of this approach:
"Putting the work in now also will save you a lot of time later. You'll be able to reduce the manual workload (and fewer errors caused by human data-entry), inform long-term growth and collect all of the specific data you're looking for".
Beyond improving data accuracy, custom properties unlock advanced reporting and automation possibilities. Workflow triggers simplify processes like onboarding and notifications, while AI-powered smart properties take it further by summarizing call transcripts and conducting web research, reducing the need for manual input.
Treating custom properties as a dynamic system, rather than a one-time setup, is key. Regular audits, consistent naming conventions, and thoughtful field types ensure your CRM remains a powerful tool as your business evolves. When managed effectively, custom properties become the backbone of data-driven strategies for sales, marketing, and customer success teams.
FAQs
What are the advantages of using custom properties in HubSpot for B2B SaaS companies?
Custom properties in HubSpot let B2B SaaS companies track and manage data that standard fields simply can't cover. Think of details like "Annual Contract Value" or "Customer Onboarding Stage." These fields make it possible to customize your CRM to fit your specific business needs, keeping your data accurate and well-organized.
With custom properties, you can take your segmentation and personalization to the next level. Whether you're targeting marketing campaigns or tailoring sales outreach, you can filter by criteria such as industry, company size, or product interest. This level of detail also strengthens your reporting and analytics, giving you a clearer picture of customer behavior and pipeline performance to guide smarter decisions.
On top of that, custom properties help power workflow automation. For example, they can trigger actions like assigning tasks or sending notifications based on specific property values. This not only saves your team time but also keeps everyone aligned and working efficiently. In short, custom properties fine-tune your CRM for better data accuracy, stronger engagement, and a more seamless operation.
How can I keep my custom properties organized and prevent data silos in HubSpot?
To maintain order and avoid data silos in your CRM, group related custom properties into logical categories. This approach makes it simple to locate and manage them effectively. Stick to clear and consistent naming conventions to ensure properties are easy to identify and use.
HubSpot’s dynamic property features can help you gather the data you need without creating duplicates. It’s also a good idea to periodically review and remove unused or redundant properties. This keeps your CRM clean and organized, paving the way for efficient data management and reporting.
Which HubSpot subscription plans include advanced custom property features?
To unlock advanced custom property features in HubSpot, you'll need a Professional or Enterprise subscription for tools like the Marketing Hub, Sales Hub, or Service Hub. These subscription levels offer expanded customization options and support for API integrations, giving you more control over property management.
For businesses aiming to fine-tune their CRM with custom properties, these higher-tier plans are tailored to help you create, organize, and manage data efficiently, ensuring it aligns seamlessly with your specific business goals.